
Find all 25 mementos, starting in the Miner Diner basement. The Silver Pines mementos route takes you through boss drops, locked rooms, sewer passages, and the final nightmare; bring back the crowbar, sledgehammer, and Manhole Cover Key for gated pickups. Old Corsage and Bloody Corsage share one collection spot, so you collect one of those two rather than both.
Where is the Empty Matchbox in Silver Pines?
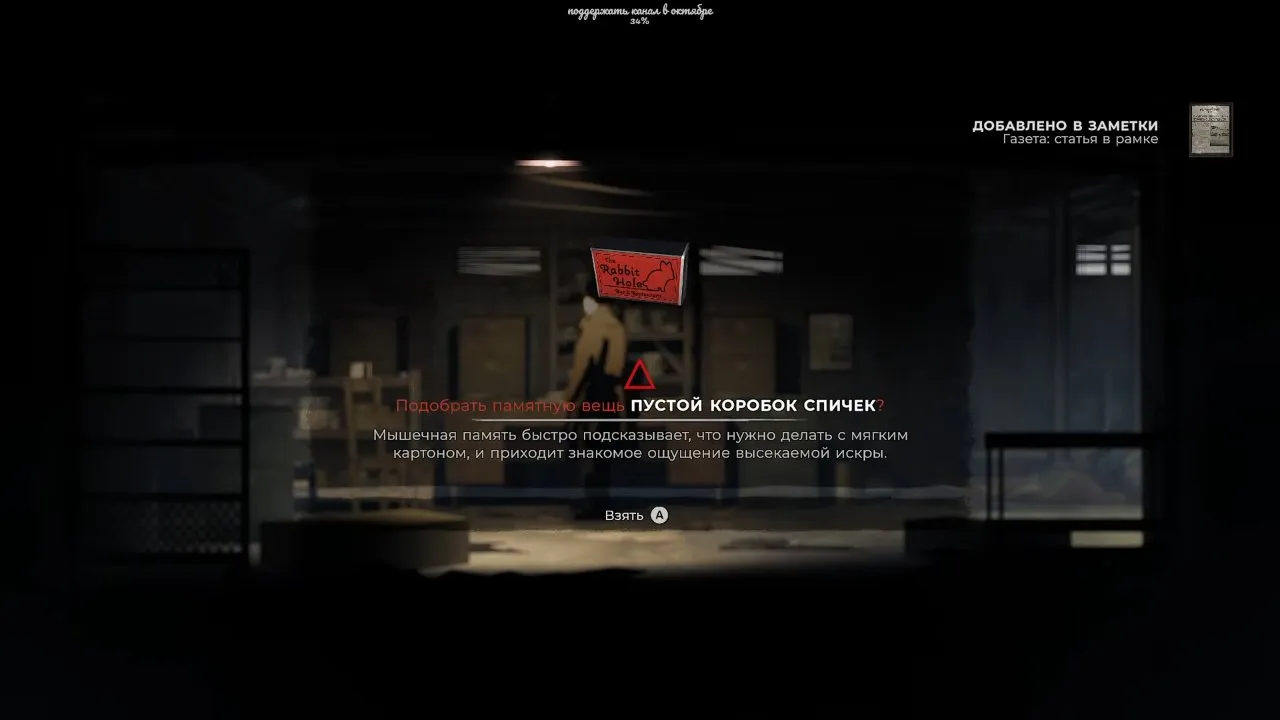
The Empty Matchbox is on the desk in the Miner Diner basement office, behind the barrier near the bathrooms.
- Take the box cutter from outside Rodney's General Store and return to the diner.
- Cut through the barrier near the bathrooms, go downstairs, and enter the office.
- Interact with the desk pickup. The matchbox prompt shown above is your confirmation that you found it.
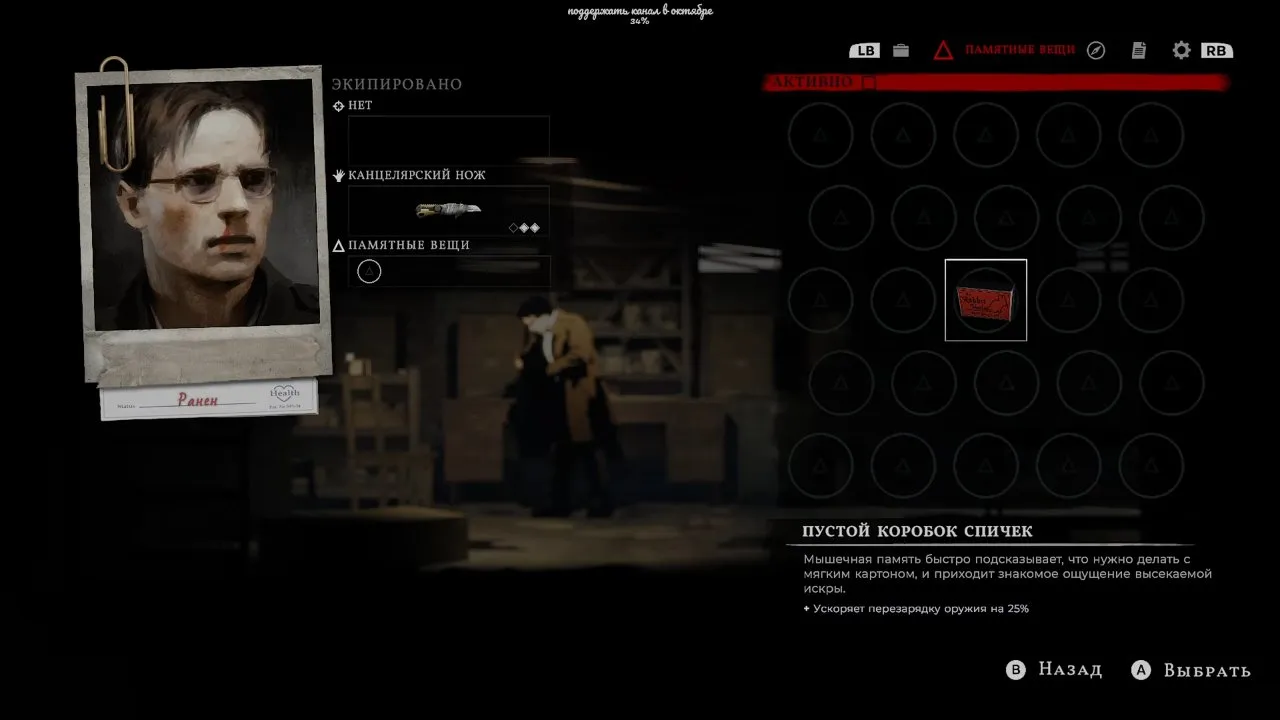
Open the Mementos menu and equip it for 25% faster weapon reloads. The screenshot shows the matchbox selected and the 25% bonus in its description. Picking it up gives you the item; equipping it gives you the perk. For your early firearm pickups, follow silver pines weapons.
Where are the motel and Outskirts mementos?
Search the palm tree room, the ferry tunnel boss's body, and the room behind the underpass wall; also take the first Polaroid half from Eddie's guitar case.
| Memento | Where to go and what to do | Effect |
|---|---|---|
| Chipped Ceramic Bear | At Crimson Bear Motel, use the Pool Net on the pool grate, then clean the Grime Covered Object with Cleaning Solution to obtain the Door Knob. Fit it to the palm tree door downstairs. After Eddie's dream performance, turn the nearby light on and back off, then check the sofa on the left. | +10 maximum stamina |
| Corroded Iron Ball | Defeat the tunnel boss on the way to the ferry and inspect its body before leaving. | 10% less damage received |
| Switchblade Cufflink | Return to the Outskirts underpass and break the wooden wall with the shotgun. Check the crate in the room behind it. | 30% faster melee attacks |
| Repaired Polaroid, first half | Open Eddie's guitar case on the bed in the Grizzly Suite. Keep the Torn Polaroid half for the Rabbit Hole pickup below. | Requires both halves |
The ceramic bear appears on the sofa after the light sequence, and the iron ball is a corpse pickup after the fight. Stop for those interactions before moving on. The guitar case gives you a Torn Polaroid, so one half alone is not the finished memento. Follow silver pines motel for the surrounding route.
Where are the Downtown and Sheriff's Office mementos?
Downtown's pickups come from the cafe bird cage, its back room, and the Rabbit Hole mirror; the Sheriff's Office and Dana's Auto Repair add three more.
| Memento | Location and required action | Effect |
|---|---|---|
| Smooth Stone with a Hole | Collect the red, yellow, and silver bird statuettes, then place all three in the Quiet Hour Cafe's hanging cage. Search the vet clinic, cinema, and the area past the digging man's mobile home. | 20% more headshot damage |
| Mended Tooth | Enter the Quiet Hour Cafe back room through the Ammo Zone backlot. Read the sign through Ammo Zone's front window and set the backlot padlock to ♠ ♥ ♣ ♦. | 15% more melee damage; melee weapons break 25% faster |
| Repaired Polaroid | Take the second Torn Polaroid half from the dressing table mirror backstage at the Rabbit Hole. Combine it with the Grizzly Suite half. | Faster healing item use; Flatleaf Herb heals 50% faster |
| Badge 0013 | With the crowbar from the evidence lockup, open the right-hand body drawer in the Sheriff's Office Cold Storage and pry the badge from the corpse's mouth. | The last shot in a magazine deals 25% more damage |
| Snake Earring | Defeat Deputy Roberts in the Sheriff's Office and check his body. | Faster firearm rate of fire |
| Hula Figurine | Use the crowbar to break into the rear garage at Dana's Auto Repair. Crawl under the car on the left and search the blue car's trunk. | Dodging uses 25% less stamina |
The cafe cage opens to reveal the stone once the bird set is complete. Combining the photo halves produces Repaired Polaroid; check for that finished name before counting it. The badge's 0013 also serves as the projector puzzle answer. Keep silver pines codes handy when you reach the locks, and follow silver pines sheriff's office through the department.
Mended Tooth has a real cost: stronger hits wear your melee weapon out faster. If durability is already low, a perk without that penalty is the steadier choice.
Where are the Union Apartments, sewer, and Town Hall mementos?
Check the apartment dream beach, the flooded laundry back room, the Riverside tunnels, the Gazette, and Town Hall's hidden rooms.
| Memento | Location and required action | Effect |
|---|---|---|
| Sea Polished Glass Shard | After the Union Apartments boss and the apartment 4B dream transition, move left on the dream beach and pick it up. | Swimming uses much less stamina |
| V Guitar Pick | Use the sledgehammer on the cracked wall in the Union Apartments' flooded basement. Clear the enemies and enter the laundry back room. | The final hit of a combo deals 30% more damage |
| Rusted Spur | Open the Apartment Street manhole with the Manhole Cover Key. Near the sewer control panel, break the cracked wall on the right with the sledgehammer and open the next manhole. Search at the foot of the ladder. | 10% more ranged damage; more recoil |
| Driftwood Stake | Open the northeast Riverside manhole near Exit 13 with the Manhole Cover Key. Follow the tunnels left, clear the enemies, and search the dead bodies at the end. | Slashing weapons deal 15% more damage |
| Faceless Coin | Break the sewer's cracked wall with the sledgehammer and climb into the Silver Gazette. Search the back room. | Charged melee attacks deal 20% more damage |
| 30 Days Sober Chip | Return to the Town Hall basement furnace with the sledgehammer. Break the nearby cracked wall, clear the enemies, and search the artist's gallery. | Melee attacks use 30% less stamina |
| Cracked Wrist Watch | Fit the Crank Handle to the rooftop Town Hall clock and match the stopped clocks around town. After the tower chimes, pull the third-floor corridor candlestick and enter the secret room. | Melee attacks are 20% faster and stronger while Wounded or Critical |
The clock looks like a time-entry puzzle, but the useful completion signal is the tower chime. If setting the hands does not trigger it, refit the crank and try the interaction again. Once it chimes, the previously inactive candlestick opens the hidden door.
Breakable basement walls can release enemies, so clear the room before going for the pickup. For the apartment sequence, follow silver pines union apartments; for the furnace and sewer passages, continue with silver pines town hall.
Where are the ship, Pet Clinic, and Church Hill mementos?
The ghost ship holds Worn Silver Buckle, the Pet Clinic basement holds Cat Collar, and Church Hill contains the corsage, Dice Pair, and Damaged Compass.
| Memento | Location and required action | Effect |
|---|---|---|
| Worn Silver Buckle | Take the ship manual from the Riverside jetty. At the ship in Downtown's southern harbor, operate the hatch controls in this order: Door → Release the clamp → Activate. Enter, defeat the enemy, and loot its body. | Sprinting melee attacks deal 25% more damage |
| Cat Collar | Take the Pet Clinic Key from the car trunk in the storage unit by the UNION sign, opened with the crank. Get the Friendly Paws List upstairs. Swim left from the railings near the sewers to the platform under the clinic, kill the guarding dog, and unlock the cat's cage with 3819. | Replaces your dodge with a faster roll |
| Old Corsage or Bloody Corsage | Take the Shovel from the digging man's caravan Downtown, then dig the disturbed earth in the Church Hill cemetery. Your apartment 4B offering determines which corsage you get. | See the choice below |
| Dice Pair | In the funeral home's bloody basement storage room, smash the cracked wall on the left with the sledgehammer. Search the backpack behind it. | 20% more ranged damage; 30% more damage received |
| Damaged Compass | Equip Sea Polished Glass Shard and swim left to the docks on Church Hill's far west shore. Break the crate. | 20% faster running |
The Pet Clinic note lists Howard 3, Uno 8, Amber 1, and Beryl 9. Read their ages in that order to get 3819. The cage opens and frees the cat; collect the collar afterward. The ship hatch opening confirms the control sequence worked. Bring ammunition before going down into the ship.
Dice Pair trades a ranged damage increase for a larger incoming damage penalty. Leave it unequipped if surviving the next fight matters more than burst damage. Sea Polished Glass Shard is the safer swimming choice for the compass trip. Follow silver pines church hill through the cemetery and funeral home.
Should you choose Old Corsage or Bloody Corsage?
Choose the Bird Effigy offering for Old Corsage's recoil reduction, or the Injured Bird offering for Bloody Corsage's damage increase and incoming damage penalty.
In the apartment 4B dream, collect the Injured Bird, Black Flesh, and Bloody Feathers. Combine the feathers with the flesh to make a Bird Effigy. Feed your chosen item to the thing in the hole; the later cemetery dig gives you the corresponding corsage.
Bird Effigy: Old Corsage, recommended for safer gun handling
Old Corsage improves weapon handling and reduces recoil by 40%. Choose this if keeping shots under control is your priority. At the Church Hill grave, the pickup should be Old Corsage.
Injured Bird: Bloody Corsage
Bloody Corsage increases damage dealt by 15%, but also increases damage taken by 10%. Choose this when you accept the survival tradeoff. At the same grave, the pickup should be Bloody Corsage. You only need one corsage for this collection spot.
Where are the broadcasting station and final nightmare mementos?
The broadcasting station contains Red Driving Glove and The Driver's 8 Ball Gear Shift; Polaroid Negative comes after the final boss.
| Memento | Location and required action | Effect |
|---|---|---|
| Red Driving Glove | Take the Stage 1 Key from the office at Thelend Broadcasting. Enter Stage 1, shoot the vent high on the left, climb through, and descend the ladder. | Melee charge time is halved |
| 8 Ball Gear Shift | Use the Stage 1 color-light setup to turn the set red, then fight The Driver and loot his body. | +10 stamina, 10% more damage dealt, and 10% less damage received |
| Polaroid Negative | Defeat the final flesh tree boss in the red-door nightmare and collect the memento before leaving the boss area. | Shots have a 20% chance to pierce |
For The Driver encounter, the stage turning red is the visual checkpoint before you head onto the set. Check his corpse after winning. For the final nightmare, save before using the third Metal Spike on the flesh tree, then collect Polaroid Negative after the fight. Follow silver pines mount siah kopa for the finale route.
Collect boss-body mementos immediately after each victory, and check the palm tree room before moving on. Those pickups are easy to walk past. Confirm the item is in your Mementos menu before leaving the area.
How do you unlock more memento slots?
Combine four Vessel Shards into a Memento Vessel, then consume it to add an equipment slot.
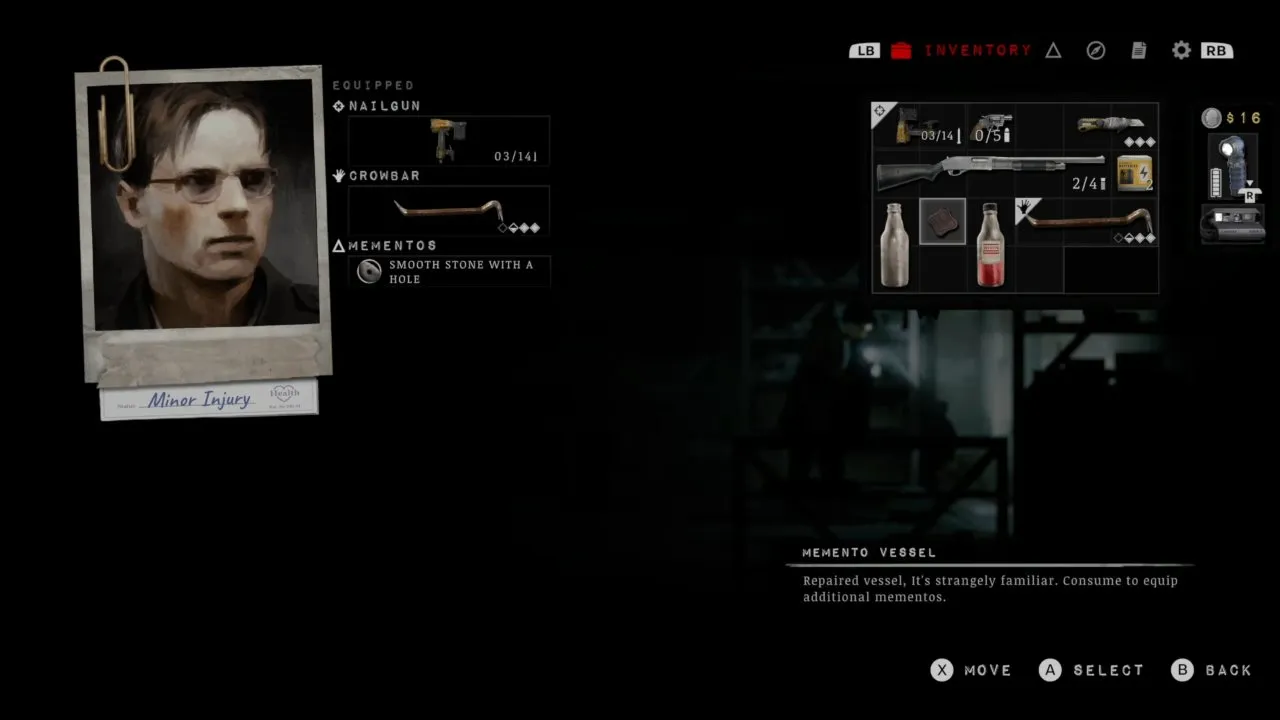
- Look for green bird statues. Shoot them down, or strike them if you can reach them, to collect the pieces.
- Combine four pieces into a Memento Vessel. Check that the completed vessel appears in your inventory.
- Consume the vessel. Keeping it in your bag does not finish the upgrade: its description tells you to consume it.
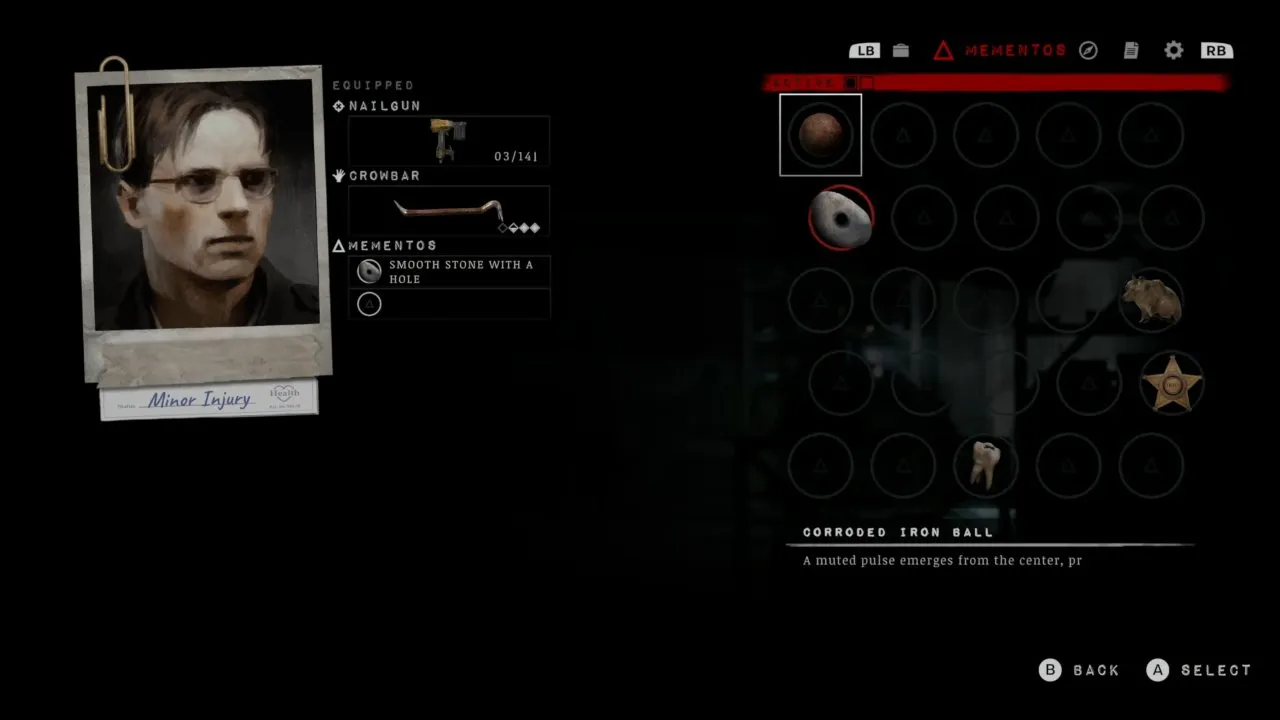
Return to the Mementos menu to confirm the extra empty slot, as shown beneath Smooth Stone with a Hole in the screenshot. You start with one equipment slot, so this upgrade lets you keep another passive perk active at the same time. The green shard statues serve a different purpose from the red, yellow, and silver cafe puzzle birds.
With the pickups collected and your slots expanded, you can equip perks for the next stretch instead of leaving them in the collection grid. Collecting all 25 also unlocks the Live ending; continue with silver pines endings when you are ready to finish the run.